
Sunday, September 1, 2013
Finnish Apple Pancakes
Tuesday, June 4, 2013
DIY Chocolate chalkboard
End of the year is coming so the kids and I decided to make teachers chocolate chalkboards as part of their gift.
Here's what you need:
Chocolate bar (any size)
Toothpick
Powdered sugar


Sorry, tried to turn these but the won't co-operate. This
Here's what you need:
Chocolate bar (any size)
Toothpick
Powdered sugar

This is the kind of chocolate bar I used. You don't want any
"additions" in your bar like almonds etc. because you'll
want the chalkboard to have a smooth surface.
You can use any size chocolate bar, I decided
to use the larger symphony bars.

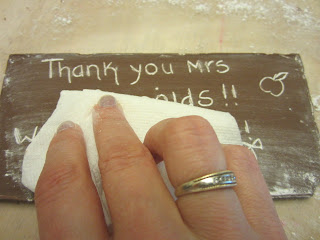
Rub the bar with your finger or a paper towel to remove
the shine.

Write your message with a tooth pick.

Sprinkle powdered sugar on the bar and rub in with
your finger.

Wipe the sugar off with a paper towel.

Sorry, tried to turn these but the won't co-operate. This
is what the finished product looks like.
If you want to be fancy, you can use caramel or fruit leather as a border. You can also use white sprinkles as chalk and press them into the top edge of the border along the bottom edge of the chalk board.
Till next time!
PS. If your chocolate bar breaks, you can melt the pieces together like I did on the chocolate bar to the right. It's not going to be the cutest thing ever but it will work. If not, go buy another and start over!
Tuesday, May 21, 2013
Great DIY Project: Easy Outdoor Chandelier

Oh my goodness, isn't this the cutest??!!! I had to highlight it on my blog because it's just so brilliant! Please go HERE to get the step by step instructions. Robin from All Things Heart and Home has posted great pictures to go with the whole DIY so you will be able to make this no problem.
Happy end of May (almost)!
Wednesday, May 1, 2013
DIY Dry Erase Tooth Brushing Chart
My youngest, a boy, does not want to brush his teeth so I've been trying to find a way to encourage him to do so. How does one do that?? Well, I thought I'd start with a tooth brushing chart. Each morning and night that he brushes, he gets to put an "x" on the sun or the moon. If all of the suns and moons are x'd out by the end of the week, he'll get a special surprise. My chart is a 5 week chart so little by little I'll make the time period longer to earn a special surprise.
I went to the dollar store and got supplies.


I went to the dollar store and got supplies.

Frames - 2 kids, 2 frames ;)
Dry erase markers

I glued a magnet on the picture frame to hold the dry erase markers in place.

And this is what they look like finished. The frames are a teeny bit too
small but I don't mind that.

And while I had my glue gun out, I made some magnets for the wee ones too :)
Till Next Time!
Thursday, March 14, 2013
Easy Baby floor quilt
This DIY quilt takes about 1.5 - 2 hrs to complete and will cost about $25-30 (Hobby Lobby prices).


STEP 7: After you pin, sew the edges and down to the pointy end of the corners all the way around. Voila, you are done!
Here's what you will need:
 |
| Fabric and batting |
1 1/4 yards fleece (for the back)
1 1/8 yards cotton (for front)
High loft batting doubled (doubling is optional but makes a thicker more comfy quilt)
Sewing thread
Yarn/Ribbon for tying
Pins
Yard stick
Sewing machine
Scissors
 |
| Back of the quilt with batting on top. |
STEP 1: Lay down the material you chose for the backside, right side facing the work surface. Lay the batting on top trying to keep it even on all 4 sides.
 |
| "Front" material on top. |
STEP 2: Lay the "front" material on top of the batting, making sure it's somewhat even on all of the sides. Not too hard, right?

STEP 3: Now you will be preparing to tie the quilt to keep the batting in place. I used a yard stick to divide the blanket into 6" squares. As you can see from the picture, I inserted a pin every 6" all the way across and all the way down the blanket. After I insert a row of pins, I go back and pin the 3-layer "sandwich" together (i.e. just work the inserted pins down through the 3 layers and then back up on the top).
STEP 4: I didn't take a picture of the tying because I didn't think to :( but it's easy. Get your quilting needle and cut a long piece of yarn/ribbon. Insert all the way through the fabric leaving a tail where the pins are going in, and then come back up leaving a little gap between entry and exit points. Double knot and cut. Repeat through the whole blanket.
How big of a gap should you leave between entry and exit points? That all depends on how much yarn/ribbon you want visible on the quilt. Sorry, there's no more specific rule here.
I left about a 2" tail for my yarn but yours can be either shorter or longer. I also tied my quilt on the back side because I don't want the baby to chew on the yarn. It's just my preference so you follow your own heart on this one.
Once you are done tying, you can trim some of the batting and the top piece if they go over the bottom piece. They probably won't but if they do, trim with scissors.
STEP 5: Once you're done tying, you'll start making a border around the quilt. I made a 1" border this time, 2" before that, so once again, the choice is yours.
 |
| Making the border |
I fold the bottom fabric twice and pin. I am showing the first fold in the picture above. Please note that the second fold should go over the batting and the top layer (see the first picture in Step #6). I hope this makes sense.
STEP 6: The corners. There are a couple of ways to make a corner but this is how I do it.

When you get to the end of one side, your quilt will look like this. See the tail?

Fold the it down...
 |
... then start folding the fabric like in step #5. You may have to work a little to get the corners to meet at the pointy edge and the bottom, but it shouldn't be too hard.
STEP 7: After you pin, sew the edges and down to the pointy end of the corners all the way around. Voila, you are done!
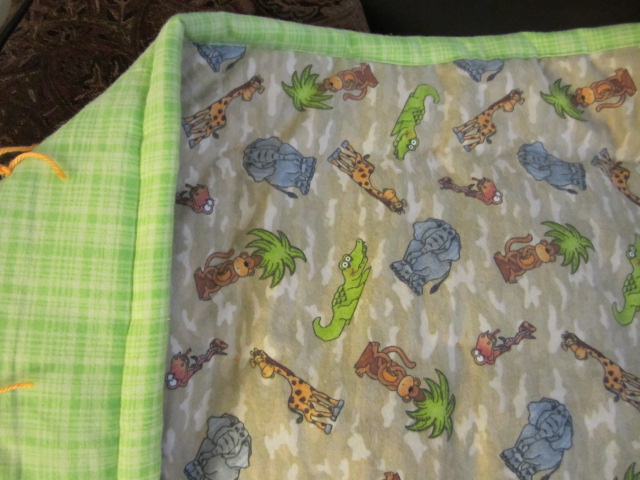 |
| Finished product |
Wednesday, February 6, 2013
Glitter wall paint: Valspar's paint crystals review
I never knew such a thing existed until my friend painted her daughter's room purple with glitter. Once my little girl heard about it, it had to be done in her room too. Since her room was due for some spicing up, I thought we could try this.


So for about $40 I got a totally different look in this room. And we are not done yet!

Before: This is what we started with, a pearl colored wall.

Here is the "glitter": Valspar's paint crystals in silver.
This little package is mixed with 1 gallon of paint. For
more glittery effect, you can mix 2 pouches with 1 gal
of paint, or mix just one with a quart depending on
your paint needs.

After: My paint is Valspar's Princess Pink. You really
can't see the glitter unless you are close to the wall but
it is really pretty when the light hits it.
I am really happy with the way the wall turned out and recommend paint crystals. They were easy to use and mix with the paint. The only word of warning is that you have to use all of the glitter paint within 5 days or buy more glitter to mix in if you want the same effect.
Cost of the project:
**Paint: about $33/gallon at Lowes
**Paint crystals: about $8 at LowesSo for about $40 I got a totally different look in this room. And we are not done yet!
Thursday, December 27, 2012
My wonderful mommy trunk!

My kids are very eager to clean and do chores lately. You may be asking yourself what's my secret? It's something called a mommy trunk! No more asking a hundred times to pick up, clean up, brush up, wipe up, or shape up. I ask once and that's it (Hallelujah chorus singing). My wonderful mommy trunk has changed my life and this is how it works.
I have a trunk, well actually just a cheap laundry basket from Walmart but that wouldn't have looked nearly cool enough in the picture. Use whatever works and whatever your budget can afford. I tell the kids to pick up their toys, backpacks, shoes, coats, whatever ONE time. If the items don't get picked up, they go in the mommy trunk. Simple enough so far, right?
To redeem their precious and sometimes very much needed items, they have to reach into an envelope that I've filled with different tasks, and pull out a piece of paper (we keep recycling the papers). Written on that is some kind of a chore, and here are some examples of chores I have on mine:
Put up all the toys off the floor in your room
Dust your room
Give your sibling a compliment
Vacuum your room
Help mommy with lunch/dinner
Dust your computer desk and computer
Read a book
Wipe down bathroom counter, sink and faucet
Empty dishwasher
Vacuum living room
Vacuum TV room
Put up toys in the TV room
Put all the shoes in the bucket
Vacuum daddy’s office
Ask daddy for a task
Ask mommy for a task
Ask your sibling for a task ((
Recite: Mom is cool, mom is great, she’s the one I appreciate! :)
Do X jumping jacks
Organize toys on the
porch
Sweep kitchen floor
Sweep the front porch
Take out the trash
Dust the fireplace
Clean the bathtub
Clear the table after
dinner
Load the dishwasher
Unload the dishwasher
Tell daddy how much
you appreciate him and why
You have to do NOTHING!
Merry Christmas to you
J
Vacuum and mop the
kitchen floor
Vacuum and mop your
bathroom floor
Pass one of the
Articles of Faith
Help cook dinner
Sing mommy a song
Sing daddy a song
Do the dishes
Wipe down kitchen
cabinet doors
Wipe kitchen counters
Wipe down bathroom cabinet doors
Wipe down bathroom door
Wipe down bathroom cabinet doors
Wipe down bathroom door
One last thing, if a toy doesn't get redeemed in month, I donate it. The kids know the rules and we are all on the same wonderful page. That's my secret, what's yours?
Subscribe to:
Posts (Atom)


